Thursday 31 December 2015

My Year In Review - Top Picks From 2015

Hello everyone! Are you ready to greet 2016? With the New Year just hours away, I thought I'd share my Top Ten for 2015 - a collection of my favourite projects from this year. If you'd like a closer look, here are some handy links to take you right over to the original posts with the projects you might like to see again.


Shabby Chic Dress Form - I made this dress form during a Spellbinders Partner Blog Hop and I have tutorial for it, too. You will be surprised what it looked like before the transformation!

Spring Art card - this spring inspired card was made as my guest DT make for the Frilly and Funkie Challenge Blog.

Bird's Nest Artist Trading Block - shabby chic, serene take, using the Sizzix ATB die and my all time fave stamp Nestled Bird from Stampendous.

Steampunk dRamatic Society - a Steampunk version of the artist trading block die. Certainly much more drama going on there, contrary to its calm shabby chic 'sibling' above.

Mr & Mrs Wedding Card - this card opened this year's wedding makes season on my blog...

Sunflower Wedding Card - another wedding card for family nuptials which took place in a stunning scenery of Château de Javarzay in Chef-Boutonne in France. This region is known for its numerous sunflower fields - a truly magical place...

Sunflower Layout - a scrapbook page I created to commemorate this magical sunflower themed wedding.

Woodland Fairy - a sweet mixed media wall hanging with a sleeping woodland beauty.

Gardener's Dream Seed Packets - floral gift packets with a short tutorial - perfect as a lovely handmade gift for any keen gardener.

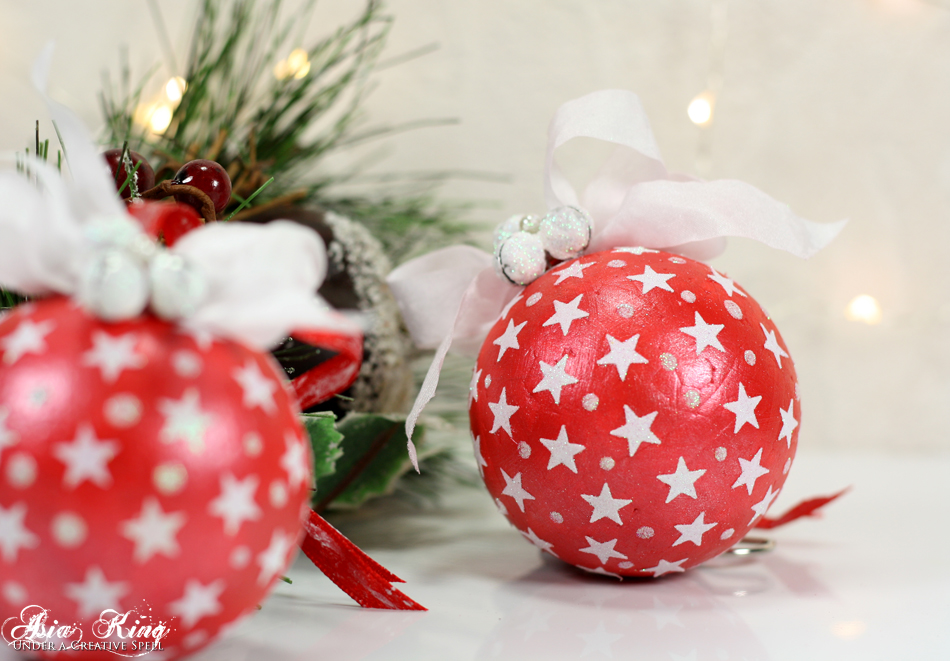
Snowy Postcard - most recent project in the above collection - a Christmas card inspired by Tim Holtz's 12 Tags of 2015.

I hope you will enjoy hopping through my favourite picks... I'd love to know which one is your favourite? :)

Finally, my heartfelt 'thank you' for your friendship and encouragement throughout these past 12 months. Every single click, every single comment, every message with a question or feedback, they have all been a real gift to me - thank you, thank you, thank you. Have your eyes peeled tomorrow as I will be back with a sweet surprise for you. Or maybe even two!

Until then, let's raise a glass for a happy, successful and full of accomplished dreams 2016! Happy New Year, my friends!


Big New Year's hugs!

Asia King Blog signature_small

Follow on Bloglovin
♥ Follow Me On Bloglovin'
Read More

Wednesday 30 December 2015

Wishes From The Snow Queen

Hello everyone! Thank you so much for your lovely comments on my Christmas Train Card and if you missed my post & tutorial for the Easy Glitter Ice Skates ornaments, be sure to check it out here.

Here's another Christmas card I haven't had a chance to post yet. This one is sporting a frosty Snow Queen look :). Hope you like it! I chose one of my favourite winter colour palettes of whites, blues and pink/purples - I love this colour scheme for frosty makes.


Supplies:
Crystal Micro Glitter
Medium Perfectly Clear™ Acrylic Handle
Mixed Media White Paper
Memento™ Tuxedo Black Ink by Tsukineko®

Plus: Cardstock by Bazzill Basics Paper®

Adhesives by Scrapbook Adhesives by 3L®: 3D Foam Squares Regular - White, Thin 3D Foam Squares Mix - White, DODZ™ - Medium, DODZ™ - 3D, E-Z Runner® Permanent Strips

Chameleon Color Tones Markers: NU1, BL3, BL6, BV4, PR4, PK3

Deco-Art Snow-Tex; Tim Holtz Distress Inks - Faded Jeans, Broken China, Peacock Feathers; Liquid Pearls; background paper - Sandylion Sticker Designs - Snowflakes; May Arts ribbon; decorative brad; paper distressing tool, cheese cloth, metal spatula, glitter pens.

Instructions:
1. Prepare an A6 card blank from purple cardstock.
2. Trim a background panel from Snowflakes paper 1/16 inch smaller than the card base on each side. 3. Using Yule Diamonds and Holiday Words stamps add some stamping to the background panel with the Distress Inks.
4. Distress the edges with a paper distressing tool or scissors. Adhere the panel to the card base.
5. Stamp the Snow Queen image in black onto the Mixed Media Paper and colour in with the Chameleon markers. Fussy cut the Snow Queen and the big snowflake.
6. Adhere the cut - out images to the card over the 3D foam squares - varying the height of the elements.
7. Adhere a piece of cheese cloth along the bottom edge of the card as if the Snow Queen was behind it.
8. Using a small metal spatula randomly spread some DecoArt Snow-Tex over the cheese cloth and sprinkle with Micro Glitters. Allow to dry fully.
9. Tie a double bow from coordinating ribbon, embellish it with a pearl brad and attach to the card using DODZ™ - 3D.
10. Finish the card with Liquid Pearls and glitter pen accents.

Also sharing today:
Pam Hornshu
Tenia Nelson

I am hoping to be back tomorrow with my favourite projects of 2015 - hope you will get a moment to pop in before your New Year's celebrations begin :). But I am certainly back on the 1st January 2016 with a BIG SWEET SURPRISE and to wish you all a Happy New Year :).

Thank you so much for stopping by and for any kind words left to let me know you've been - every comment is much appreciated.

Big crafty hugs


Asia King Blog signature_small

Follow on Bloglovin
♥ Follow Me On Bloglovin'

Challenges for this card:
DecoArt Mixed Media Blog - Winter Wonderland Challenge
Frilly and Funkie - Holiday Hues
That's Crafty Challenge Blog - Anything Goes
Read More

Monday 28 December 2015

Get Your Glitter Ice Skates On!

Hello everyone! How was your Christmas? I hope you had a magical time! I really wanted to use this time to have a proper hop around your wonderful blogs as I have shamefully been neglecting my visits lately - please forgive me. Unfortunately my Christmas joy was taken over by a horrible cold and I am still fighting hard to get rid of it. But I promise to catch up on my visits as soon as I am back on my feet...!


A short post today just to let you know that I have a project tutorial over at Scrapbook Adhesives by 3L® for these Easy Glitter Ice Skates Ornaments.

Supplies:

Scrapbook Adhesives by 3L­®: Adhesive Sheets 4x6"

Other supplies: Ice Skates and Snowflake Sky rubber stamps , Crystal Micro Glitter (Stampendous); DecoArt Americana Decor Chalky Finish Paint - Everlasting; Brilliance Pearlescent Poppy ink; water brush; wooden flat coasters; baker's twine


I hope you will get a moment to check out my easy-to-pin tutorial! Thanks for stopping by and for taking the time to comment - I always love and appreciate reading your comments! :)

Big crafty hugs
Asia King Blog signature_small

Follow on Bloglovin
♥ Follow Me On Bloglovin'
Read More

Thursday 24 December 2015

Merry Christmas Everyone!

Hello and warmest welcome to all peeking in here on this fine Christmas Eve evening. While some of you might still be busy with last minute shopping, wrapping, decorating, cooking or any other pre-Christmas pottering about, I will be sitting down to have the Christmas Eve meal with my beloved family.

Being Polish I get the privilage of celebrating Christmas one day early. And yes, we get the pressies early,  too! Yaaay! :)

So allow me to wish you all a wonderful, happy and peaceful Christmas, full of magic and miracles and that this special time can be shared with all those who are close to your hearts.

I have a special festive train waiting for you today to take you straight to Christmas! :)


Stampendous:
Christmas Train
Aged Hunter Embossing Enamel
Aged Scarlet Embossing Enamel
Green Glass Glitter
Fresh Green Glass Glitter
Red Glass Glitter
Mixed Media White Paper
Boss Gloss Embossing Ink
Memento™ Tuxedo Black Ink by Tsukineko®

Plus:Cardstock by Bazzill Basics Paper®

Adhesives by Scrapbook Adhesives® by 3L: E-Z Runner Permanent Strips, Keepsake Envelopes, DODZ-3D

Chameleon Markers - GR3, BR5, CG8, BK4, RD4, NU1
Embossing Heat Tool

Ribbon by May Arts; metal holy leaves and bells; glitter brad, thin metal wire; assorted sequins.

Christmas Ephemera & Papers: Simple Stories - December Documented, Fancy Pants - Be Different

Instructions:

  1. Create a square card blank 5" x 5". Cut a panel from background paper 1/16th inch smaller on each side than the card blank.
  2. Adhere the panel to the card. Cut out Christmas ephemera and add to the background as shown. 
  3. Stamp Christmas Train in black onto Mixed Media paper and colour in with Chameleon Markers. Fussy cut the image.
  4. Insert the train image into a Keepsake Envelope and add a mixture of Glass Glitters and sequins.
  5. Peal off the protective tab to seal the Envelope. Peel of the backing sheet and adhere the Envelope to the card.
  6. Wrap a red and green gingham ribbon around the front card panel and tie a bow. Embellish with a glitter brad. 
  7. Cover the metal holy leaves with Boss Gloss ink and sprinkle with Aged Hunter Embossing Enamel. Heat using the heat tool.
  8. Cover three metal bells with Boss Gloss ink and sprinkle with Aged Scarlet Embossing Enamel. Heat using the heat tool. Secure the bells to the leaves using a thin metal wire.
  9. Adhere the holy cluster to the card.
Merry Christmas everyone! Thank you for being part of my Christmas,  too!

Big festive hugs 

Asia King Blog signature_small

Follow on Bloglovin
♥ Follow Me On Bloglovin'

Challenges for this card:
That's Crafty Challenge Blog - Anything Goes
Emerald Creek Dares - Celebrations Around the World
Read More

Saturday 19 December 2015

Christmas Is In the Air And A Snowy Postcard

Re-eited: Yaaaay! My card was featured in the Designer Spotlight at Simon Says Stamp Monday Challenge! Woot woot!!! :)

Hello everyone and my warmest welcome on this pre-Christmas weekend :) I thought I would pop in to share another Christmas card I made - this one was inspired by Tim Holtz's December tag from 12 Tags of 2015.


I don't often play with tags (although I always promise myself to create more of them) so I extended the theme of Tim's inspiration tag onto a card.

I more or less followed the steps on Tim's tutorial. For the sprayed burlap panel I used Red Pepper Color Wash and Dreamweaver Holiday Greetings And Holly stencil. The main panel was stamped with Brilliance Pearlescent Olive ink (my fave ink ever!) using this gorgeous Stampendous Snowy Postcard stamp (my fave stamp ever!) and I added some shading with Inktense pencils (my fave pencils ever!). I also heat embossed in Detail Black the Christmas Air sentiment.


For the wreath I used a punch and dies from Martha Stewart, Spellbinders and Marianne's Designs and mounted the foliage with heaps of DODZ™ Small. Then I added a handful of baby cones (picked up outside my work office lol) and a Bella Bow sprayed with Red Pepper Color Wash. Spraying the felt bow made the ink concentrate in some parts more than in others and I loved the vintage, washed out look it created.


Finally I gave the card a light dusting with the Dylusions White Linen ink spray (my fave ink spray ever!) and a light brush with Everlasting Chalky Finish paint (my fave paints ever!).

Looks like I managed to squeeze in quite a few faves of mine in this little card lol. Oh well, I hope it was worth it and that you'll like my card! :).


Thank you for stopping by today and I'm sending you all lots of warm pre-Christmas hugs! xx

Asia King Blog signature_small

Follow on Bloglovin
♥ Follow Me On Bloglovin'

Also linking to:
Tim Holtz 12 Tags of 2015 - December
That Craft Place Challenge Blog - Christmas
Vintage Stamping Challenges #39 - Winter Trees
Simon Says Stamp Wednesday Challenge - Die Crazy
Country View Challenges - Create a Scene
The Craft Barn Weekly Challenge - Tree
Simon Says Stamp Monday Challenge - Just a pinch (of snow dusting)
Emerald Creek Dares - Celebrations Around the World
Read More

Monday 14 December 2015

Easy DIY Shabby Chic Bauble Ornaments

Re-edited: Yaaay! My baubles are within the top picks for the 'Wish Upon a Star' challenge at Our Creative Corner! - Yippie!!! :-) :-)

Hello my lovelies! How are your Christmas preparations going? This year I am far more organised that I have been for years, yet still plenty to be done - will I ever be happy with the progress of my pre-Christmas prep? :)

Today I am over at Scrapbook Adhesives by 3L's blog sporting a tutorial for these super cute and super easy Styrofoam bauble ornaments. I made these for my BFF who's just moved into her first very own home :). To see how I made these you'll need to hop over to see my tutorial but I'll secretly mention that there is some glitter, Donna Salazar and DecoArt magic going on there!

Donna Salazar and Scrapbook Adhesives by 3L

Supplies:

E-Z Stars Runner - Refillable Donna Salazar with Scrapbook Adhesives by 3L®; Home and Hobby: Quick and Easy Dual Tip Glue pen.

Other supplies:

Stampendous Crystal Micro Glitter
DecoArt MagiKote medium, Metallic Lustre Radiant Red, Americana Dimensional White Writer

Styrofoam balls, pins, ribbon, bells


Easy shabby chic DIY Christmas bauble ornaments

Thank you for stopping by today and for all your heart warming comments - I read every one of them and they make me very very happy!

Big pre-Christmas hugs

Asia King Blog signature_small

Follow on Bloglovin
♥ Follow Me On Bloglovin'

Also linking to:
Live & Love Crafts #42 - Sparkle
Our Creative Corner - Wish Upon a Star
Read More

Sunday 13 December 2015

Seashell Jar and Happy Birthday, Laura!

Hello Friends! It's a very special day today - our Stampendoulicious Fairy Stamp Mother, fantastic DT coordinator, talented crafter and most importantly amazing friend Laura Weed is celebrating her birthday! So the Stampendous gang are hosting a birthday hop today to show how much we love our Fairy Stamp Mother! 

I hope you will join me and my DT Sisters to wish Laura a very happy birthday - we'd love it if you hopped along to see what inspiration we're sharing today for this occasion. It may be a welcomed break from Christmas cards lol :-). Here's who's hopping today:


I'm sharing a cute nautical card I made a while ago :).

Supplies

From Stampendous: 

Seashell Jar 
Near the Sea 
Andy Skinner Cling Industrial Set 
Shabby Blue Embossing Enamel 
Aged Ivory Embossing Enamel 
Golden Sand Embossing Powder 
Pop Up Die Set 
Taupe Color Fragments 
Jumbo Perfectly Clear™ Acrylic Handle 
Mixed Media White Paper 

Plus: 
Memento™ Tuxedo Black Ink by Tsukineko® 
Cardstock by Bazzill Basics Paper® 
Ribbon by May Arts 

Adhesives by Scrapbook Adhesives by 3L®: E-Z Runner® Permanent Strips, Adhesive Sheets 4x6", 3D Foam Squares - White 

Spectrum Noir Alcohol Markers, Evergreen & Tea Dye Distress Inks (Ranger Ink), Glossy Accents, burlap panel, charms and decorative pins, Liquid Pearls, adhesive pearls Spellbinders Labels One
Instructions:
1. Create a 6x6" card blank from turquoise cardstock
2. Using scraps of white card repeatedly stamp crackle pattern from the Industrial set with Evergreen ink. Cut the cards into strips of varying width and ink up the edges.
3. Arrange the strips to resemble wood planks and adhere to the card leaving a 1/16" border (as shown). Add a piece of burlap positioning it diagonally.
4. Stamp the Sea Shell Jar in black onto Mixed Media paper and color in (I used Spectrum Noir markers).
5. Using encrusted jewel technique melt in Shabby Blue, Aged Ivory, Golden Sand and Taupe Color 6. Fragments into the background.
7. Die cut your stamped panel with Labels One die and adhere to a mat 1/16" bigger than the stamped panel (use the die as a template for fussy cutting).
8. Cover the jar with Glossy Accents and allow to dry fully. Adhere the panel to the card over 3D Foam Squares.
9. Stamp the Near The Sea sentiment onto white card and die cut using a bezel/label die from the Pop Up Die Set. Ink the edges.
10. Finish the card with a ribbon bow, pearls, charms and decorative pins.


Happy birthday Miss Laura! Hope you have an amazing day!


Asia King Blog signature_small

Follow on Bloglovin
♥ Follow Me On Bloglovin'
Read More
.
Related Posts Plugin for WordPress, Blogger... All content, except where stated (including text, photographs and designs), is copyright of Asia King (Creative Spell Designs). I share my artwork for personal inspiration only. I don’t mind if you copy any of my designs for your own personal use, providing you give me credit by referring to my blog. You may not however copy my designs and photographs for contests and publications entries (online or otherwise) or to sell in either handmade or printed form. You may not copy my designs and photographs for advertising & commercial purposes, without my prior permission. Thank you for your understanding.
MyFreeCopyright.com Registered & Protected

Craft Blogs - BlogCatalog Blog Directory blog button flower Photobucket Crafty Blogs

Let's Tweet!

Powered by Blogger.

© 2011 Under a creative spell, AllRightsReserved.

Designed by ScreenWritersArena